Parts of a Tub Faucet
Parts of a Tub Faucet
When it comes to understanding the components of a tub faucet, it’s essential to recognize that each part plays a critical role in its overall functionality. Whether you’re troubleshooting an issue or planning a bathroom renovation, knowing what these parts are and how they work together can save you time and money. In this section, we’ll delve into the handle, one of the most visible and frequently used components of a tub faucet.
Handle
The handle is perhaps the most recognizable part of a tub faucet. It serves as the primary interface between the user and the plumbing system, allowing for the control of water flow and temperature. Typically, there are two handles—one for hot water and one for cold water—or a single lever handle that combines both functions. The design of the handle can vary significantly depending on the style and brand of the faucet, but its purpose remains consistent across all models.
Types of Handles
Handles come in various styles, including traditional, modern, and minimalist designs. Some faucets feature a single lever handle, which simplifies operation by allowing users to adjust both the water flow and temperature with just one hand. This type of handle is particularly popular in contemporary bathrooms. On the other hand, dual-handle systems are often seen in older homes or more classic-style bathrooms. These require separate adjustments for hot and cold water, providing greater precision for those who prefer fine-tuned control.
Material and Durability
The material used to construct the handle can greatly affect its durability and aesthetic appeal. Common materials include brass, stainless steel, chrome, and ceramic. Brass is known for its strength and resistance to corrosion, making it a popular choice for high-quality faucets. Stainless steel offers a sleek, modern look while being highly resistant to rust and stains. Chrome-plated handles provide a polished appearance and are relatively easy to maintain. Ceramic handles, although less common, offer a luxurious touch and are often used in high-end fixtures.
Maintenance Tips
Proper maintenance of the handle ensures smooth operation and extends the lifespan of the faucet. Regular cleaning with mild soap and water can prevent buildup of mineral deposits and grime. Avoid using abrasive cleaners or harsh chemicals, as these can damage the finish. If the handle feels stiff or difficult to turn, it may indicate a problem with the internal valve assembly, which we’ll discuss later in this article.
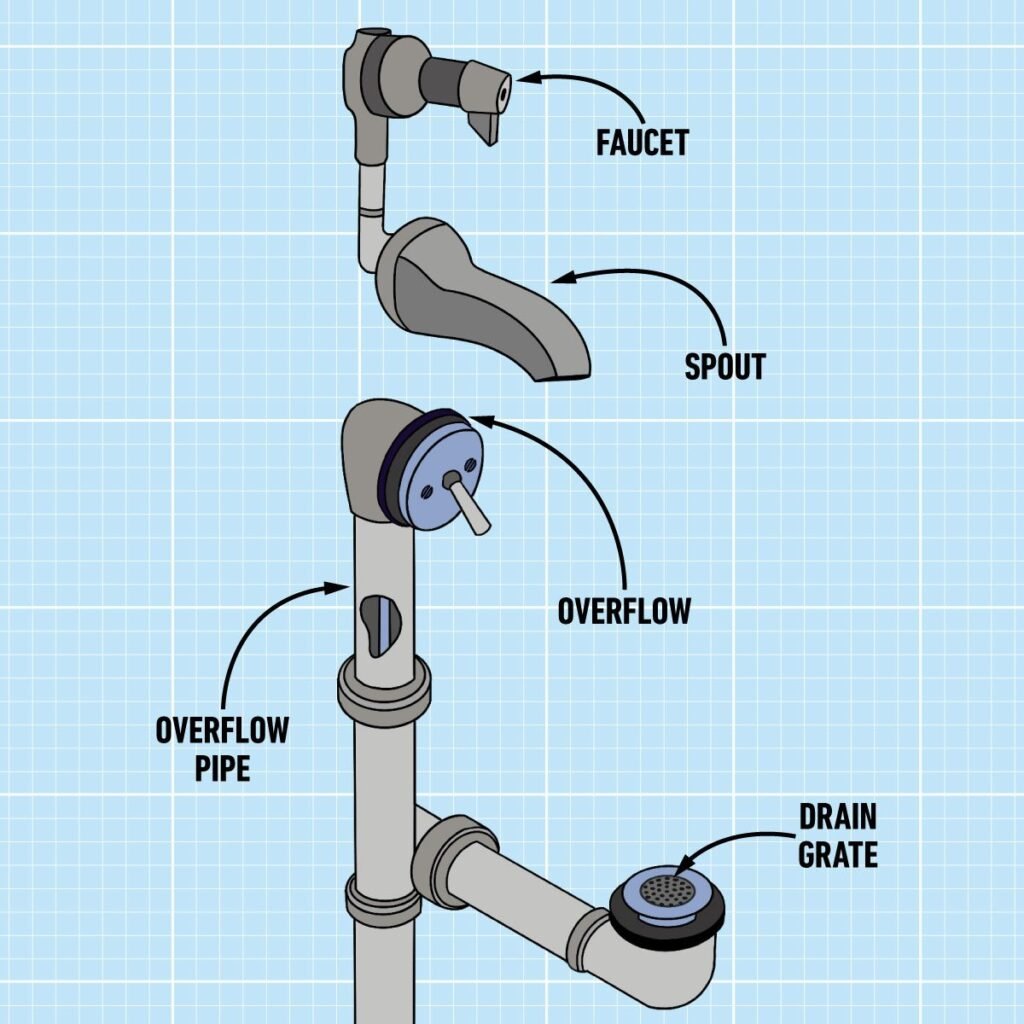
Spout
The spout is another vital component of a tub faucet. It is the part through which water flows into the bathtub, delivering water directly to where it’s needed. Like the handle, the spout comes in various shapes and sizes, each designed to complement different bathroom aesthetics and functional requirements.
Design Variations
Spouts can be straight, curved, or gooseneck, depending on the desired style and practicality. A straight spout provides a streamlined, minimalistic look and is ideal for smaller tubs. Curved spouts add elegance and grace to a bathroom, while gooseneck spouts elevate the height of the water outlet, making it easier to fill large containers or accommodate taller objects. When selecting a spout, consider the size of your tub and the overall design theme of your bathroom.
Water Flow and Pressure
The spout plays a significant role in regulating water flow and pressure. Most modern spouts are equipped with advanced technology to ensure efficient water delivery without compromising performance. For instance, some spouts incorporate aerators to mix air with water, creating a steady stream that reduces water usage without sacrificing pressure. Others feature diverter mechanisms that allow water to be redirected to a showerhead when needed.
Installation and Replacement
If you’re considering replacing or upgrading your spout, it’s important to choose one that matches the existing faucet setup. Ensure that the new spout has compatible threading and dimensions to fit seamlessly with the rest of the plumbing system. If you’re unsure about installation, consulting a professional plumber can help avoid potential leaks or damage. Additionally, periodic inspections of the spout can reveal signs of wear, such as cracks or corrosion, which should be addressed promptly to prevent further issues.
Valve Assembly
At the heart of every tub faucet lies the valve assembly, a crucial component responsible for controlling water flow and mixing. Without a properly functioning valve assembly, the faucet would fail to deliver water at the desired temperature or pressure. Understanding how this part works can help you identify and resolve common problems effectively.
Components of the Valve Assembly
The valve assembly typically consists of several key elements, including the cartridge, stem, and seals. The cartridge regulates water flow and temperature by moving within the valve body. It is often made from durable materials like brass or ceramic to withstand frequent use and exposure to water. The stem connects the handle to the cartridge, enabling users to adjust the settings manually. Seals, such as O-rings and washers, prevent leaks by creating tight connections between moving parts.
Common Issues and Solutions
One of the most common issues with valve assemblies is leaking. This usually occurs when the seals wear out or become damaged over time. Replacing worn O-rings or washers can often resolve the problem, but if the cartridge itself is faulty, it may need to be replaced entirely. Another issue is difficulty in turning the handle, which could indicate a stuck or corroded stem. Lubricating the stem or disassembling the valve assembly for cleaning might restore smooth operation.
Upgrading the Valve Assembly
For homeowners seeking improved performance or energy efficiency, upgrading the valve assembly is a viable option. Modern valves often feature innovative technologies, such as thermostatic controls, which allow for precise temperature regulation and enhanced safety. These upgrades can significantly enhance the user experience and reduce water wastage. However, it’s important to ensure compatibility with the existing faucet system before making any changes.
Escutcheon
An often-overlooked but important part of a tub faucet is the escutcheon, also known as the cover plate. This component serves both a functional and decorative purpose, covering the gap between the wall and the faucet body. While it may seem like a minor detail, the escutcheon plays a vital role in maintaining the aesthetic appeal of your bathroom.
Functional Role
From a functional standpoint, the escutcheon acts as a barrier against moisture and debris, protecting the area behind the wall from potential damage. It also helps conceal unsightly gaps or imperfections in the installation, ensuring a clean and polished look. Properly installed escutcheons contribute to the longevity of the faucet and surrounding surfaces by minimizing exposure to water and dirt.
Stylistic Options
Escutcheons come in a wide range of styles and finishes to match different bathroom designs. They can be circular, oval, or rectangular, and are available in materials such as chrome, brushed nickel, oil-rubbed bronze, and matte black. Choosing an escutcheon that complements the faucet and other fixtures in your bathroom can create a cohesive and visually appealing space. Some manufacturers even offer customizable options, allowing homeowners to personalize their escutcheons with unique patterns or engravings.
Cleaning and Care
To keep the escutcheon looking its best, regular cleaning is essential. Use a soft cloth and mild detergent to wipe away dirt and grime, avoiding harsh chemicals that could damage the finish. If the escutcheon becomes scratched or tarnished, replacement is relatively simple and cost-effective. Many hardware stores stock standard sizes and styles, making it easy to find a suitable replacement.
Decorative Plate
Similar to the escutcheon, the decorative plate enhances the visual appeal of a tub faucet. However, unlike the escutcheon, which primarily serves a functional purpose, the decorative plate focuses on aesthetics. It adds a finishing touch to the faucet, drawing attention to its design and craftsmanship.
Enhancing Visual Appeal
Decorative plates are available in a variety of shapes, sizes, and finishes, offering endless possibilities for customization. They can be ornate and intricate, featuring detailed engravings or textures, or they can be sleek and minimalist, blending seamlessly with the faucet’s design. By choosing a decorative plate that aligns with your personal taste and bathroom decor, you can elevate the overall look of your space.
Compatibility Considerations
When selecting a decorative plate, ensure that it is compatible with your faucet model. Manufacturers often provide specific guidelines for pairing decorative plates with their products, so consult the product manual or website for recommendations. If you’re unsure, seek advice from a professional installer to avoid potential complications during installation.
Long-Term Maintenance
Like other parts of the faucet, the decorative plate requires regular maintenance to preserve its appearance. Wipe it down with a damp cloth after each use to remove soap scum and water spots. For tougher stains, use a non-abrasive cleaner specifically designed for bathroom fixtures. With proper care, your decorative plate will continue to enhance the beauty of your tub faucet for years to come.
O-Rings
Small yet mighty, O-rings are essential components of a tub faucet. These tiny rubber rings create a watertight seal around moving parts, preventing leaks and ensuring smooth operation. Although they may seem insignificant, O-rings play a critical role in maintaining the integrity of the faucet.
How O-Rings Work
O-rings function by compressing under pressure, filling any gaps between surfaces and forming a secure seal. They are commonly found around the stem of the valve assembly and other areas where water flow is regulated. When properly installed, O-rings allow the faucet to operate without dripping or leaking. Over time, however, they can degrade due to exposure to water, chemicals, and heat, necessitating replacement.
Replacing O-Rings
Replacing worn or damaged O-rings is a straightforward process that can be done with basic tools. Start by shutting off the water supply and removing the affected part of the faucet. Carefully extract the old O-ring using needle-nose pliers, taking care not to scratch the surrounding metal. Apply a small amount of silicone lubricant to the new O-ring before inserting it into place. Once reassembled, test the faucet to ensure the leak has been resolved.
Preventive Measures
To extend the life of your O-rings, practice good maintenance habits. Avoid exposing the faucet to harsh chemicals or extreme temperatures, as these can accelerate degradation. Periodically inspect the O-rings for signs of wear, such as cracking or hardening, and replace them as needed. By addressing issues early, you can prevent more serious problems from developing.
Washers
Another important sealing component of a tub faucet is the washer. Washers work in conjunction with O-rings to prevent leaks and ensure proper water flow. Unlike O-rings, which are typically made of rubber, washers are often constructed from materials like neoprene or nylon, chosen for their durability and resistance to wear.
Functionality of Washers
Washers are positioned at various points within the faucet, including the base of the valve assembly and the connection points between the spout and the wall. Their primary function is to create a barrier against water, preventing it from escaping through gaps or joints. A well-maintained washer ensures that the faucet operates efficiently and without leaks.
Identifying Washer Problems
A leaking faucet is often a sign of a worn or damaged washer. If you notice water dripping from the spout or handle, it’s likely that the washer needs replacement. To confirm, disassemble the faucet and inspect the washer for signs of wear, such as flattening or tearing. If the washer appears compromised, replace it with a new one of the same size and material.
Installation Best Practices
Installing a washer correctly is crucial for its effectiveness. Begin by ensuring the surface where the washer will sit is clean and free of debris. Place the washer snugly into position, making sure it fits securely without being overly compressed. Tighten the surrounding components gently to avoid damaging the washer. After reassembly, test the faucet thoroughly to verify that the leak has been fixed.
Aerator
For faucets equipped with an aerator, this small device plays a big role in conserving water while maintaining strong water pressure. Located at the end of the spout, the aerator mixes air with water, creating a steady, even flow that reduces splashing and minimizes water waste.
Benefits of Aerators
Using an aerator can lead to significant savings on water bills, as it limits the amount of water flowing through the faucet without diminishing performance. Additionally, aerators help prevent mineral buildup by reducing the concentration of water droplets, which can prolong the life of the faucet. Many modern aerators are also designed to be removable, allowing for easy cleaning and maintenance.
Types of Aerators
Aerators come in different types, each suited to specific applications. Fixed aerators provide a constant flow rate, while adjustable aerators allow users to modify the water output according to their needs. Some aerators feature advanced filtration systems to remove impurities from the water, enhancing both safety and quality.
Cleaning and Maintenance
Regular cleaning of the aerator is necessary to maintain optimal performance. Remove the aerator from the spout and soak it in vinegar or a descaling solution to dissolve mineral deposits. Rinse thoroughly with water and reinstall, ensuring it is securely fastened. If the aerator becomes clogged or damaged beyond repair, replacement is relatively inexpensive and straightforward.
Diverter
Finally, many tub faucets include a diverter, a mechanism that redirects water from the spout to the showerhead. This feature is especially useful in combination tub-and-shower setups, allowing users to switch between bathing modes effortlessly.
Operation of Diverters
Diverters are typically activated by pressing a button or pulling a lever located near the spout. When engaged, the diverter closes off the water flow to the spout and opens the pathway to the showerhead. This seamless transition is achieved through a series of internal channels and seals that direct water to the desired outlet.
Troubleshooting Diverters
If the diverter fails to function properly, it could indicate a blockage or damage to the internal components. Disassemble the diverter carefully and inspect for obstructions or worn parts. Clean any debris and replace damaged seals or O-rings as needed. If the problem persists, consulting a professional plumber may be necessary to diagnose and repair the issue.
Energy Efficiency
Using a diverter can contribute to energy savings by reducing the amount of water wasted during transitions between the tub and shower. By ensuring that water flows only to the selected outlet, diverters promote more efficient use of resources. This eco-friendly benefit makes them a valuable addition to any bathroom setup.
Detailed Checklist for Maintaining Your Tub Faucet
To keep your tub faucet in top condition, follow this comprehensive checklist:
Inspect the Handle Regularly
- Check for stiffness or difficulty in turning.
- Clean with mild soap and water to prevent buildup.
- Replace worn handles if necessary.
Examine the Spout for Leaks
- Look for drips or moisture around the spout.
- Clean the spout with a soft cloth to remove mineral deposits.
- Consider upgrading to an aerated spout for better water efficiency.
Test the Valve Assembly
- Listen for unusual noises during operation.
- Inspect seals (O-rings and washers) for signs of wear.
- Replace faulty components to restore smooth operation.
Check the Escutcheon and Decorative Plate
- Ensure they are securely attached and free of damage.
- Clean with appropriate solutions to maintain their finish.
- Replace if scratches or discoloration occur.
Maintain O-Rings and Washers
- Periodically inspect for cracks or hardening.
- Lubricate with silicone grease before installation.
- Replace as needed to prevent leaks.
Clean and Service the Aerator
- Remove and soak in vinegar to dissolve mineral deposits.
- Reinstall securely and test for proper water flow.
- Replace if cleaning doesn’t resolve issues.
Verify Diverter Functionality
- Test switching between spout and showerhead.
- Disassemble and clean internal components if blocked.
- Consult a professional for persistent problems.
By adhering to this checklist, you can ensure that your tub faucet remains functional, efficient, and aesthetically pleasing for years to come.
Deja una respuesta