Parts of a Bridle
Parts of a Bridle
The bridle is one of the most essential tools in horse riding, serving as the primary means of communication between the rider and the horse. It is a carefully designed piece of equipment that combines functionality with comfort, ensuring that both the rider and the horse can work together harmoniously. The bridle consists of several components, each playing a unique role in its overall effectiveness. Understanding these parts is crucial for anyone who wishes to ride safely and effectively. In this section, we will delve into the headstall, exploring its purpose, design, and importance.
Headstall: The Backbone of the Bridle
The headstall is the foundational component of the bridle, responsible for securing the entire apparatus onto the horse's head. This part wraps around the upper portion of the horse's head, just behind the ears, providing a stable base for attaching other components such as the browband, cheekpieces, and throatlatch. Its primary function is to ensure that the bridle remains securely in place during riding, regardless of the horse's movements or the terrain being traversed.
The design of the headstall can vary depending on the type of riding discipline and personal preference. Some headstalls are made from leather, which offers durability and a classic aesthetic, while others may be crafted from synthetic materials like nylon or neoprene for added flexibility and ease of maintenance. Regardless of the material, the headstall must fit snugly but comfortably around the horse's head to avoid causing discomfort or irritation. A poorly fitting headstall can lead to behavioral issues, such as head tossing or resistance, which can compromise both the horse's well-being and the rider's control.
Proper adjustment of the headstall is critical for its effectiveness. The strap should sit just behind the horse's ears, without pressing too tightly against them. If the headstall is too loose, the bridle may slip forward, disrupting the positioning of the bit and reins. Conversely, if it is too tight, it can cause discomfort and even pain, leading to unnecessary stress for the horse. To ensure a proper fit, riders should regularly check the tension of the headstall and make adjustments as needed, especially after extended periods of use or changes in the horse's physical condition.
Importance of Material Selection
When choosing a headstall, the material plays a significant role in both its performance and longevity. Leather headstalls are often favored for their traditional appearance and ability to mold to the shape of the horse's head over time, offering a customized fit. However, they require regular care to prevent cracking or stiffening, which can occur due to exposure to moisture and sunlight. Synthetic materials, on the other hand, offer a low-maintenance alternative that is resistant to environmental factors but may lack the same level of elegance as leather.
For riders who prioritize functionality over aesthetics, adjustable headstalls with quick-release buckles or elastic inserts can provide additional convenience. These features allow for easy adjustments during tack changes and can accommodate slight variations in the horse's head size due to seasonal changes or growth. Ultimately, the choice of material should align with the rider's goals, whether they prioritize tradition, practicality, or a combination of both.
Practical Tips for Maintaining the Headstall
Maintaining the headstall is essential for preserving its integrity and ensuring it continues to function effectively. Regular cleaning and conditioning of leather headstalls can extend their lifespan significantly, while synthetic materials should be wiped down with a damp cloth to remove dirt and sweat. Additionally, inspecting the stitching and hardware periodically can help identify potential issues before they become serious problems.
Checklist for Headstall Maintenance:
- Regular Cleaning: Use a soft brush and saddle soap to clean leather headstalls, followed by a conditioner to keep the leather supple.
- Check Hardware: Ensure all buckles, rings, and straps are secure and free from rust or wear.
- Adjust Fit Regularly: Periodically assess the fit of the headstall to account for any changes in the horse's head size.
- Store Properly: Hang the headstall in a cool, dry place to prevent warping or damage.
By following these steps, riders can ensure their headstall remains in excellent condition, providing reliable support for the rest of the bridle.
Browband: Stability and Style
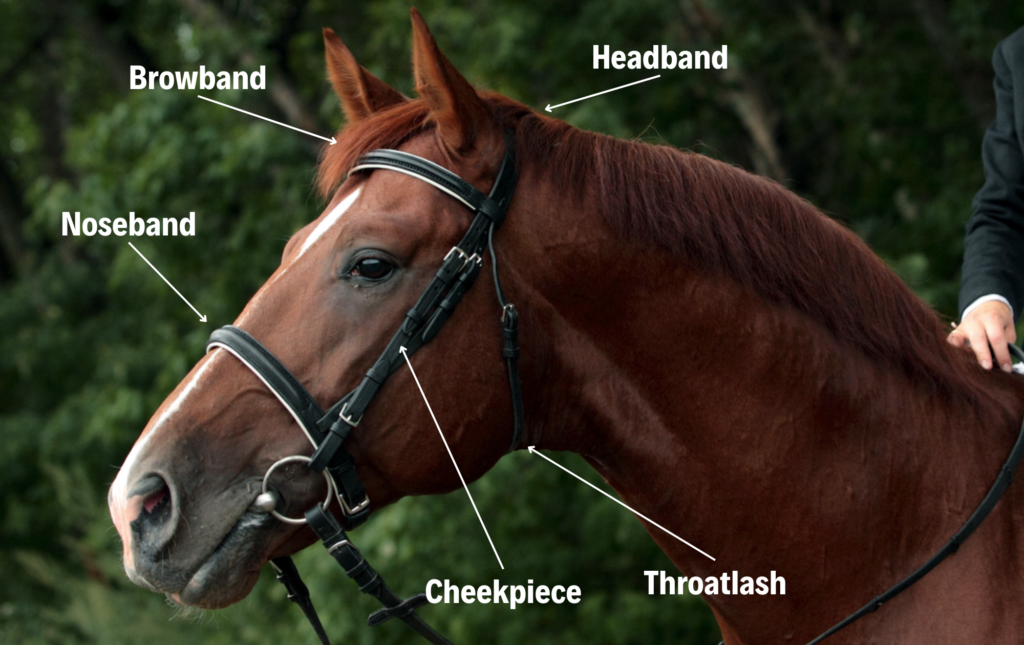
The browband is another critical component of the bridle, running beneath the horse's forelock and across the forehead. Its primary purpose is to prevent the bridle from slipping backward toward the horse's ears, which could disrupt the positioning of the bit and affect the rider's control. While its functional role is vital, the browband also serves an aesthetic purpose, often featuring decorative designs or embellishments that enhance the overall appearance of the bridle.
A well-fitted browband should sit snugly against the horse's forehead without causing pressure or discomfort. It is typically adjustable, allowing riders to customize the fit according to the horse's individual needs. The width and style of the browband can vary depending on the discipline; for example, dressage bridles often feature wider browbands for a more elegant look, while jumping bridles may have narrower bands to reduce bulk.
Material Considerations
Like the headstall, the material used for the browband can impact both its functionality and appearance. Leather browbands are popular for their classic look and durability, but they require regular maintenance to prevent cracking or fading. Synthetic options, such as nylon or neoprene, offer a lightweight alternative that is less prone to damage from sweat or moisture. Decorative elements, such as crystals or embroidery, can add flair to the browband, making it a standout feature of the bridle.
Adjusting the Browband for Optimal Performance
Achieving the correct fit for the browband is essential for its effectiveness. It should lie flat against the horse's forehead, with enough room for the forelock to pass underneath comfortably. If the browband is too tight, it can cause discomfort and restrict the horse's movement, while a loose browband may fail to provide adequate stability. Riders should adjust the browband carefully, ensuring it is neither too tight nor too loose.
Checklist for Browband Adjustment:
- Check Positioning: Ensure the browband sits directly beneath the forelock, not too high or too low.
- Test Comfort: Allow the horse to shake its head gently to verify that the browband does not pinch or irritate.
- Secure Connections: Confirm that all straps and buckles connecting the browband to the headstall are fastened securely.
- Monitor Fit Over Time: Regularly reassess the browband's fit, as the horse's head may change shape slightly with age or season.
By adhering to these guidelines, riders can ensure their browband performs optimally while maintaining the horse's comfort.
Cheekpieces: Supporting the Bit
The cheekpieces are integral to the bridle's design, connecting the bit to the headstall and helping maintain its position within the horse's mouth. These straps run down the sides of the horse's face, providing leverage for the rider to communicate through the reins. Properly adjusted cheekpieces are crucial for achieving effective communication and control during riding.
Cheekpieces come in various styles, including standard fixed-length straps, drop nosebands, and flash attachments, each catering to different riding disciplines and preferences. Their length and tension must be carefully calibrated to ensure the bit remains centered in the horse's mouth without applying excessive pressure. A well-fitted cheekpiece allows the horse to respond smoothly to the rider's cues, promoting harmony and cooperation.
Customizing Cheekpiece Length
Adjusting the cheekpieces to the correct length is a delicate process that requires attention to detail. The straps should be long enough to allow the bit to rest naturally in the horse's mouth but short enough to prevent it from moving excessively. Ideally, there should be about two fingers' width of space between the horse's cheek and the ring of the bit when viewed from the side. This ensures the bit maintains consistent contact with the horse's bars, the sensitive area of the mouth where pressure is applied.
Riders should experiment with different lengths to find the optimal setting for their specific horse and riding style. For instance, horses with larger heads may require longer cheekpieces, while those with smaller heads may need shorter ones. Regularly checking and adjusting the cheekpieces can help maintain consistency and prevent issues related to improper fit.
Material Choices and Maintenance
The material of the cheekpieces can influence their performance and longevity. Leather cheekpieces are widely used for their strength and classic appearance, though they require regular conditioning to remain supple. Synthetic alternatives, such as nylon or webbing, offer a durable and low-maintenance option that resists stretching or fraying over time. Regardless of the material, proper maintenance is key to extending the life of the cheekpieces.
Checklist for Cheekpiece Care:
- Inspect Regularly: Check for signs of wear, such as fraying or cracking, and replace damaged components promptly.
- Condition Leather: Apply leather conditioner periodically to prevent drying and cracking.
- Adjust Length Consistently: Verify the cheekpiece length before each ride to ensure proper fit.
- Clean After Use: Wipe down synthetic cheekpieces with a damp cloth to remove dirt and sweat.
By following these steps, riders can ensure their cheekpieces remain in excellent condition, supporting effective communication between horse and rider.
Throatlatch: Security and Comfort
The throatlatch is a vital component of the bridle, securing the apparatus under the horse's throat to prevent it from slipping off. Unlike the other parts of the bridle, the throatlatch does not directly influence control but instead provides additional stability and peace of mind for the rider. Properly fitted throatlatches ensure the bridle remains securely in place, even during vigorous activity or challenging terrain.
The throatlatch typically consists of a single strap that attaches to either side of the headstall and fastens with a buckle or clip. It should be adjusted so that it fits snugly but loosely enough to allow the horse to breathe freely. A common rule of thumb is to leave enough room for three or four fingers to fit between the strap and the horse's throat. This ensures the horse remains comfortable while still benefiting from the added security provided by the throatlatch.
Choosing the Right Throatlatch
When selecting a throatlatch, riders should consider both functionality and compatibility with the rest of the bridle. Leather throatlatches are a popular choice for their durability and classic appearance, though they may require occasional maintenance to prevent stiffness or cracking. Synthetic options, such as nylon or neoprene, offer a lightweight and easy-to-care-for alternative that is ideal for riders who prioritize practicality over aesthetics.
Ensuring Proper Fit
Fitting the throatlatch correctly is essential for its effectiveness. Riders should adjust the strap until it lies flat against the horse's throat without causing pressure or discomfort. If the throatlatch is too tight, it can restrict the horse's breathing and cause distress, while a loose throatlatch may fail to provide adequate security. Regularly checking and adjusting the throatlatch can help maintain consistency and prevent issues related to improper fit.
Checklist for Throatlatch Adjustment:
- Verify Positioning: Ensure the throatlatch sits directly under the horse's throat, not too high or too low.
- Check Tension: Confirm the strap allows enough room for three or four fingers to fit comfortably between it and the horse's throat.
- Secure Fastenings: Double-check that all buckles or clips are fastened securely.
- Monitor Fit Regularly: Periodically reassess the throatlatch's fit, as the horse's neck may change shape slightly with age or exercise.
By adhering to these guidelines, riders can ensure their throatlatch provides reliable security without compromising the horse's comfort.
Bit: The Key to Communication
The bit is perhaps the most crucial component of the bridle, serving as the primary tool for communication between the rider and the horse. Positioned in the horse's mouth, the bit applies pressure to specific areas, such as the tongue, bars, and lips, to guide the animal's movements. Different types of bits exist, each designed to suit specific riding styles and preferences, ranging from mild snaffle bits to more severe curb bits.
Choosing the right bit for a particular horse and discipline is a complex decision that depends on factors such as the horse's sensitivity, training level, and response to pressure. Riders must carefully evaluate these considerations to select a bit that promotes clear communication without causing discomfort or resistance. Properly fitting the bit is equally important, as an ill-fitting bit can lead to behavioral issues and reduced performance.
Types of Bits and Their Uses
Bits come in a wide variety of designs, each tailored to specific riding needs. Snaffle bits, for example, are commonly used in English disciplines and apply direct pressure to the horse's mouth, making them ideal for novice riders or horses requiring gentle guidance. Curb bits, on the other hand, feature a lever action that amplifies the pressure applied by the rider, making them suitable for advanced riders who require greater control.
Pelham bits combine elements of both snaffle and curb bits, offering versatility for riders who wish to switch between direct and amplified pressure. Gag bits elevate the horse's head by applying upward pressure, while double bridle setups use two separate bits to provide nuanced control. Understanding the characteristics of each type of bit can help riders choose the best option for their specific situation.
Fitting the Bit Correctly
Achieving the correct fit for the bit is essential for its effectiveness. The bit should rest comfortably in the horse's mouth, with enough room to move slightly without causing discomfort. Ideally, there should be one or two wrinkles at the corners of the horse's mouth when the bit is properly positioned. This indicates that the bit is neither too tight nor too loose, allowing for clear communication between rider and horse.
Riders should experiment with different bit sizes and shapes to find the optimal fit for their horse. Factors such as the horse's jaw structure, tongue size, and sensitivity to pressure can influence the choice of bit. Regularly checking and adjusting the bit's position can help maintain consistency and prevent issues related to improper fit.
Checklist for Bit Care:
- Inspect Regularly: Check for signs of wear, such as sharp edges or corrosion, and replace damaged bits promptly.
- Clean After Each Use: Rinse the bit with water and mild soap to remove saliva and food particles.
- Lubricate Moving Parts: Apply a small amount of oil to hinges or joints to ensure smooth operation.
- Assess Fit Frequently: Periodically reassess the bit's fit to account for changes in the horse's mouth or behavior.
By following these steps, riders can ensure their bit remains in excellent condition, facilitating effective communication and control.
Reins: Guiding the Horse
The reins are the final component of the bridle, held by the rider to direct the horse's movements. Connected to the bit, the reins transmit the rider's commands through subtle adjustments in pressure and tension. Properly adjusted reins allow for precise control, enabling the rider to guide the horse with confidence and clarity.
Reins come in various materials, each offering distinct advantages depending on the riding discipline and personal preference. Leather reins are prized for their grip and durability, though they may require regular maintenance to prevent cracking or stiffening. Synthetic materials, such as rubber or nylon, provide a lightweight and weather-resistant alternative that is ideal for riders who prioritize practicality over aesthetics. Regardless of the material, the reins must be long enough to allow for full arm extension while remaining short enough to maintain control.
Adjusting Rein Length
Adjusting the reins to the correct length is crucial for effective communication and control. The reins should be long enough to allow the rider to maintain a steady connection with the horse's mouth without pulling excessively. Ideally, the rider's hands should form a straight line from the bit to the elbows, promoting a balanced and relaxed posture. Riders should experiment with different rein lengths to find the optimal setting for their specific horse and riding style.
Maintaining the Reins
Proper maintenance of the reins is essential for preserving their functionality and longevity. Leather reins should be cleaned regularly with saddle soap and conditioned to prevent drying or cracking. Synthetic reins can be wiped down with a damp cloth to remove dirt and sweat. Inspecting the reins for signs of wear, such as fraying or splitting, and replacing damaged sections promptly can help prevent accidents or loss of control during rides.
Checklist for Rein Care:
- Check for Wear: Regularly inspect the reins for frayed ends or weak spots and repair or replace as needed.
- Clean After Use: Wipe down leather reins with a soft cloth and apply conditioner as necessary.
- Store Properly: Hang reins in a cool, dry place to prevent warping or damage.
- Adjust Length Consistently: Verify the rein length before each ride to ensure proper fit and control.
By adhering to these guidelines, riders can ensure their reins remain in excellent condition, facilitating precise guidance and control during every ride.
Deja una respuesta