Parts of a Bathroom Drain System
Parts of a Bathroom Drain System
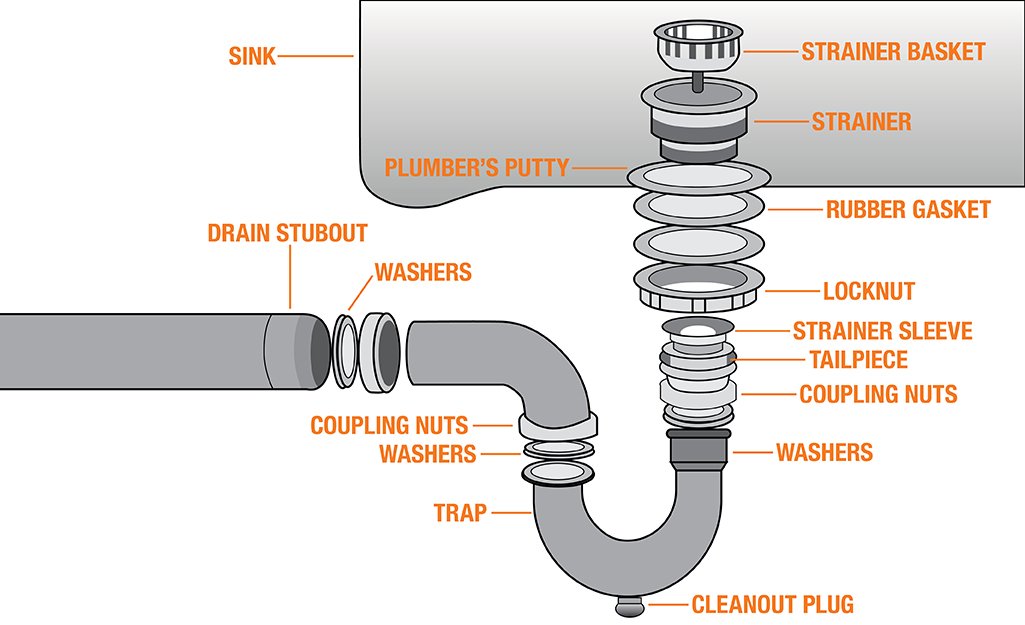
The bathroom drain system is an intricate network of components that work together to ensure efficient water removal and maintain cleanliness in your bathroom. Understanding the various parts of this system can help you troubleshoot issues, perform routine maintenance, and even carry out minor repairs. Let’s delve into the details of each component, starting with the most visible part: the drain opening.
Drain Opening
The drain opening is the point where water exits the sink, shower, or bathtub. It is the first visible part of the drainage system and plays a crucial role in facilitating the flow of water into the pipes below. Typically located at the lowest point of the fixture, the drain opening allows water to naturally flow toward it due to gravity. This design ensures that wastewater is efficiently removed without pooling on the surface.
Importance of the Drain Opening
The design and placement of the drain opening are critical for optimal performance. A poorly positioned or obstructed drain opening can lead to slow drainage, water accumulation, and even flooding. Over time, mineral deposits, hair, and debris can accumulate around the edges of the drain opening, reducing its effectiveness. Regular cleaning and maintenance are essential to prevent such issues. Using a soft brush or a specialized cleaning tool, you can gently scrub away any buildup to keep the drain opening clear and functional.
Common Issues with Drain Openings
One common issue with drain openings is blockages caused by foreign objects or excessive debris. For instance, in bathtubs, hair and soap scum often accumulate near the drain opening, leading to clogs. Similarly, kitchen sinks may experience blockages from food particles. To address these problems, it is advisable to use drain covers or strainers to catch debris before it enters the pipes. Additionally, periodic use of enzyme-based cleaners can break down organic matter and prevent blockages.
Maintenance Tips
To ensure the longevity and efficiency of the drain opening, follow these steps:
1. Inspect regularly: Check the drain opening weekly for signs of blockage or buildup.
2. Clean thoroughly: Use a mild detergent or vinegar solution to clean the area around the drain opening.
3. Preventive measures: Install mesh screens or filters to catch debris before it enters the pipes.
By maintaining the drain opening, you lay the foundation for a well-functioning drainage system.
Strainer or Pop-Up Assembly
The strainer or pop-up assembly is another key component of the bathroom drain system. Located just beneath the drain opening, this mechanism controls the water level in the sink, shower, or bathtub. It also acts as a barrier to prevent larger debris, such as hair or soap pieces, from entering the pipes. The strainer or pop-up assembly is particularly important in bathtubs, where users often need to fill the tub with water before draining it.
How It Works
The strainer or pop-up assembly typically consists of a movable stopper connected to a lever or rod. When the lever is lifted, the stopper rises, allowing water to flow freely into the drain. Conversely, when the lever is pushed down, the stopper seals the drain opening, retaining water in the fixture. This mechanism provides convenience and control, enabling users to manage water levels effortlessly.
Common Problems
Like other components of the drain system, the strainer or pop-up assembly can encounter issues over time. One common problem is a stuck stopper, which may result from corrosion, mineral buildup, or damage to the internal mechanism. Another issue is leaks around the assembly, which can occur if the seal between the stopper and the drain opening becomes worn or compromised. Addressing these problems promptly is essential to avoid further complications.
Repair and Replacement
If the strainer or pop-up assembly malfunctions, you can often repair it with simple tools and minimal effort. Start by disassembling the mechanism to inspect for blockages or damage. Clean any debris or mineral deposits using a vinegar-soaked cloth or a specialized cleaner. If the stopper or lever is damaged beyond repair, consider replacing the entire assembly. Replacement kits are widely available and relatively easy to install, even for beginners.
P-Trap
The P-trap is one of the most vital components of the bathroom drain system. Positioned directly beneath the drain opening, this curved section of pipe serves a dual purpose: it prevents sewer gases from entering the bathroom while allowing wastewater to flow smoothly into the main drainpipe. The "P" shape of the trap creates a water seal that blocks unpleasant odors and harmful gases from rising through the pipes.
Functionality of the P-Trap
The P-trap works by holding a small amount of standing water in its curved section. This water acts as a barrier, preventing sewer gases from escaping into the bathroom. At the same time, the trap allows wastewater to pass through without obstruction, ensuring efficient drainage. Proper installation and maintenance of the P-trap are essential for maintaining hygiene and safety in the bathroom.
Signs of a Problematic P-Trap
A faulty P-trap can lead to several issues, including unpleasant odors, slow drainage, or leaks. If you notice a foul smell emanating from the drain, it could indicate that the water seal in the P-trap has evaporated, allowing sewer gases to escape. This problem often occurs in infrequently used drains, such as those in guest bathrooms. Slow drainage may suggest a blockage in the P-trap, while leaks could indicate loose connections or cracks in the pipe.
Maintenance and Cleaning
To keep the P-trap functioning properly, follow these steps:
1. Check for water seal: Ensure that the P-trap always contains enough water to maintain the seal. In cases of evaporation, simply run water through the drain to replenish the seal.
2. Inspect for leaks: Regularly examine the connections and joints of the P-trap for signs of leaks. Tighten any loose fittings or replace damaged parts as needed.
3. Clean periodically: Use a plunger or a plumbing snake to remove any blockages in the P-trap. For stubborn clogs, consider using a chemical drain cleaner, but do so sparingly to avoid damaging the pipes.
Drainpipe
The drainpipe is the conduit that carries wastewater from the P-trap to the main sewer line. It is typically made of durable materials such as PVC, ABS, or copper, designed to withstand the corrosive effects of wastewater over time. The size and slope of the drainpipe are carefully engineered to ensure smooth water flow and prevent backups.
Design and Installation
Proper design and installation of the drainpipe are critical for its effectiveness. The pipe must have a sufficient slope to allow gravity to pull wastewater downward. A slope of about 1/4 inch per foot is generally recommended to achieve optimal flow. Additionally, the diameter of the pipe should match the volume of water it needs to handle. For example, a sink drainpipe might be smaller than a bathtub or shower drainpipe due to the difference in water volume.
Potential Issues
Despite its durability, the drainpipe can still encounter problems. Blockages caused by grease, hair, or other debris are common, leading to slow drainage or complete clogs. Leaks can also develop if the pipe is damaged or improperly sealed. Corrosion, especially in older metal pipes, may weaken the structure over time, necessitating replacement.
Solutions and Repairs
To address issues with the drainpipe, consider the following solutions:
1. Clear blockages: Use a plumbing snake or hydro-jetting equipment to remove obstructions from the pipe.
2. Fix leaks: Identify the source of the leak and repair or replace the affected section of the pipe.
3. Upgrade materials: If your drainpipe is old or prone to corrosion, consider upgrading to modern materials like PVC or ABS, which offer greater durability and resistance to wear.
Overflow Mechanisms
Finally, many bathroom fixtures, particularly sinks and bathtubs, are equipped with overflow mechanisms. These safety features are designed to prevent flooding in case the primary drain becomes blocked or malfunctions. By providing an alternative pathway for water to exit the fixture, overflow mechanisms play a crucial role in safeguarding your bathroom against water damage.
How Overflow Mechanisms Work
In a typical bathtub, the overflow mechanism consists of a secondary drain located near the top of the tub. If the water level rises too high, excess water flows into this secondary drain, bypassing the main drain and exiting through a separate pipe. Similarly, in sinks, overflow holes are often placed near the rim to divert water in case of blockages.
Importance of Overflow Mechanisms
While not all fixtures include overflow mechanisms, those that do provide an added layer of protection against water-related disasters. Without these mechanisms, a blocked drain could lead to significant flooding, causing damage to flooring, walls, and furniture. Regular inspection and maintenance of overflow systems ensure they remain functional and ready to act when needed.
Maintenance Checklist
To ensure the reliability of your overflow mechanisms, follow this detailed checklist:
1. Inspect regularly: Check the overflow holes and drains for signs of blockage or damage at least once every six months.
2. Clean thoroughly: Remove any debris or mineral buildup using a soft brush or a specialized cleaning solution.
3. Test functionality: Periodically test the overflow mechanism by filling the fixture with water to ensure it operates correctly.
4. Repair promptly: Address any issues, such as leaks or obstructions, as soon as they are identified to prevent further complications.
By understanding and maintaining each component of the bathroom drain system, you can ensure its longevity and effectiveness. Whether it's the drain opening, strainer or pop-up assembly, P-trap, drainpipe, or overflow mechanisms, every part plays a vital role in keeping your bathroom clean, safe, and functional.
Deja una respuesta