Parts of a Rapier Sword
Parts of a Rapier Sword
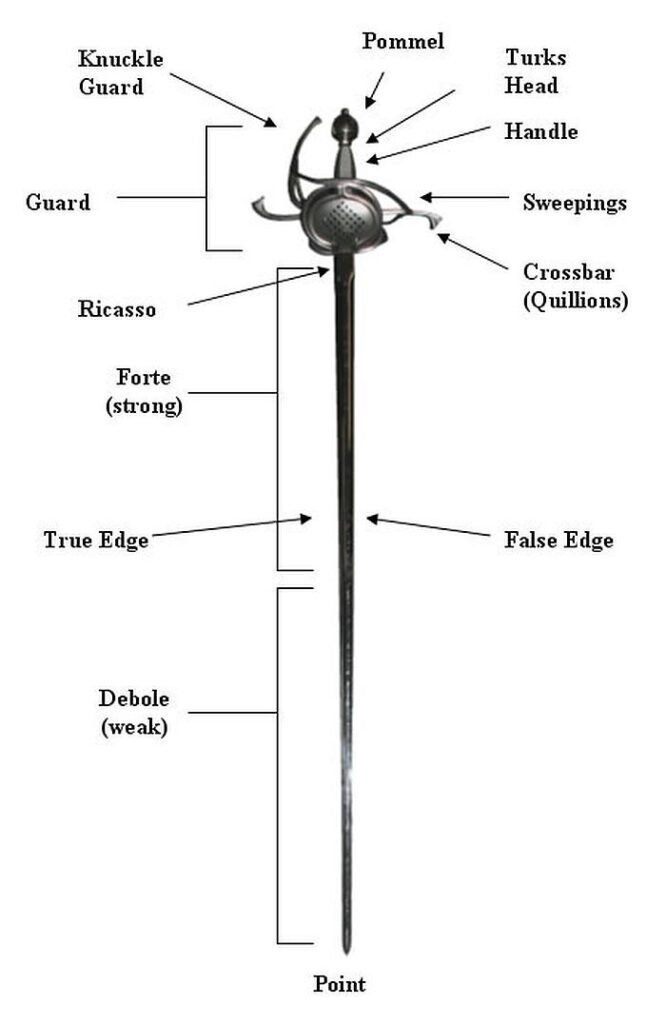
The rapier is an iconic weapon that has captured the imagination of historians, collectors, and enthusiasts alike. Originating during the Renaissance period, this elegant sword was designed primarily for thrusting rather than slashing, making it a symbol of sophistication and precision in combat. Its sleek design and intricate components make it not only a practical weapon but also a masterpiece of craftsmanship. In this section, we will delve into the various parts of the rapier, beginning with the blade.
Blade
The blade of a rapier is one of its most defining features. Typically long and slender, the blade is specifically crafted to excel in thrusting techniques. Unlike broader swords designed for cutting or slashing, the rapier's blade focuses on delivering precise, penetrating strikes. This characteristic makes it highly effective in close-quarters combat, where accuracy and speed are paramount.
Rapier blades vary in length depending on their intended use and historical period. Generally, they range from 35 to 45 inches, providing enough reach for effective engagement while maintaining maneuverability. The cross-section of the blade often features a diamond shape, which enhances rigidity without adding unnecessary weight. This design ensures that the blade remains strong enough to withstand thrusts while remaining lightweight enough for rapid movements.
In addition to its functional aspects, the blade of a rapier often reflects the artistic flair of its creator. Some blades feature etched designs or inscriptions, showcasing the skill of the blacksmith and sometimes even the identity of the owner. These embellishments not only add aesthetic value but also serve as markers of status and prestige, underscoring the dual role of the rapier as both a weapon and a status symbol.
Maintenance Tips for the Blade
To ensure the longevity and effectiveness of your rapier's blade, proper maintenance is essential. Here’s a checklist to follow:
- Regular Cleaning: After each use, wipe down the blade with a soft cloth to remove any dirt or moisture. This prevents rust and corrosion.
- Oil Application: Apply a thin layer of mineral oil or specialized sword oil to the blade periodically. This helps protect the metal from environmental damage.
- Storage Conditions: Store the rapier in a dry, temperature-controlled environment. Avoid exposing it to extreme humidity or direct sunlight, which can degrade the blade over time.
- Edge Inspection: Regularly inspect the edges of the blade for nicks or imperfections. If necessary, consult a professional to address any issues before they worsen.
By adhering to these steps, you can preserve the integrity and beauty of the rapier's blade, ensuring it remains a reliable tool for years to come.
Hilt
The hilt of a rapier serves as the handle and provides the foundation for all other components. It plays a crucial role in determining the balance, control, and comfort of the weapon. A well-designed hilt allows the wielder to execute precise movements with ease, making it indispensable in combat scenarios.
Historically, hilts evolved significantly over time, reflecting advancements in metallurgy and ergonomics. Early versions were relatively simple, consisting of a straight grip and basic crossguards. However, as dueling became more prevalent, hilts became increasingly complex, incorporating elaborate guards to protect the hand. These innovations highlight the adaptability of the rapier to changing combat needs.
One key aspect of the hilt is its ability to distribute weight evenly. The pommel at the base acts as a counterweight to the blade, creating a balanced feel that enhances maneuverability. Additionally, the materials used in constructing the hilt—such as wood, leather, or metal—can affect its overall performance. Each material offers unique advantages, whether it be durability, grip enhancement, or aesthetic appeal.
Customization Options for the Hilt
For those interested in customizing their rapier, the hilt presents numerous opportunities for personalization. Consider the following options:
- Material Selection: Choose between traditional wooden grips wrapped in leather or modern synthetic materials for improved grip and durability.
- Guard Design: Opt for different types of guards, such as cup hilts or basket hilts, based on your preference for hand protection and style.
- Engravings and Decorations: Add personalized engravings or decorative elements to the hilt, turning your rapier into a truly unique piece.
These customizations allow you to tailor the hilt to suit your specific needs and preferences, further enhancing your connection to the weapon.
Grip
The grip is a critical component of the rapier's hilt, directly impacting how comfortably and securely the weapon can be held. Traditionally made from materials like wood, bone, or ivory, the grip may also feature additional coverings such as leather or wire wrapping to improve traction and reduce slippage during use.
A well-crafted grip should conform to the shape of the user's hand, promoting a natural and secure hold. This ergonomic design minimizes fatigue during prolonged use, allowing the swordsman to maintain control even in intense situations. Furthermore, the texture of the grip plays a significant role in preventing accidental drops, especially when hands become sweaty or wet.
Historically, the grip was often adorned with decorative elements, such as carvings or inlays, to reflect the social standing of the owner. These embellishments served as indicators of wealth and refinement, reinforcing the rapier's role as a status symbol among nobility and gentlemen.
Enhancing Grip Comfort and Security
To maximize the functionality of your rapier's grip, consider implementing the following tips:
- Grip Wrapping: If the original grip covering shows signs of wear, replace it with high-quality leather or synthetic wraps designed for better grip.
- Hand Placement: Practice proper hand placement on the grip to ensure optimal control. Your fingers should wrap securely around the grip, with your thumb positioned along the spine of the hilt for added stability.
- Moisture Management: Use absorbent gloves or apply anti-slip compounds to your hands if you frequently experience sweat-related issues during practice or combat.
By focusing on these details, you can enhance your grip's effectiveness and enjoy greater confidence when wielding your rapier.
Guard
The guard is another vital part of the rapier, designed to protect the hand from opposing blades during combat. Positioned above the grip, the guard extends outward in various configurations, creating a barrier that shields the fingers, palm, and wrist. Its design has evolved considerably throughout history, adapting to meet the demands of different fighting styles and environments.
Early rapiers featured straightforward crossguards, which provided minimal protection. As fencing techniques advanced, so did the complexity of the guard. By the late Renaissance, more sophisticated designs emerged, including the cup hilt and basket hilt, offering comprehensive coverage for the entire hand. These innovations reflected the growing emphasis on safety and efficiency in dueling practices.
Beyond its protective function, the guard also contributes to the overall aesthetic appeal of the rapier. Intricate patterns and motifs often adorn the guard, transforming it into an artistic element that complements the weapon's elegance.
Choosing the Right Guard Type
Selecting the appropriate guard type depends largely on your intended use of the rapier. Below is a guide to help you make an informed decision:
- Cup Hilt: Ideal for beginners or those prioritizing maximum hand protection, the cup hilt features a rounded shield-like structure that encloses the hand completely.
- Basket Hilt: Preferred by experienced fencers who value versatility, the basket hilt combines robust protection with enhanced mobility, thanks to its open framework.
- Crossguard: For traditionalists seeking simplicity and authenticity, the classic crossguard remains a viable option, albeit with less comprehensive coverage.
Each type offers distinct benefits, so consider your skills and preferences carefully before making a choice.
Cup Hilt
The cup hilt, a specialized form of guard, represents one of the most advanced developments in rapier design. Characterized by its bowl-shaped structure, the cup hilt provides unparalleled protection for the hand, effectively deflecting incoming blows away from the fingers and wrist. This innovation revolutionized dueling practices, enabling practitioners to engage confidently without fear of injury.
Crafted from durable metals such as steel or brass, the cup hilt demonstrates exceptional resilience against repeated impacts. Its smooth surface reduces friction, allowing the rapier to glide effortlessly past opposing blades during engagements. Moreover, the cup hilt's compact size ensures that it does not impede the wielder's agility, preserving the rapier's inherent advantage in speed and precision.
Despite its many strengths, the cup hilt does have limitations. Its enclosed nature can trap heat during extended use, potentially causing discomfort for the user. Additionally, some individuals find the additional bulk cumbersome, preferring lighter alternatives like the crossguard. Nevertheless, for those prioritizing safety above all else, the cup hilt remains an excellent choice.
Basket Hilt
Alternatively, the basket hilt offers a compromise between protection and flexibility. Comprised of interwoven bars forming a cage-like structure, the basket hilt protects the hand while maintaining sufficient openness for unrestricted movement. This design caters to fencers who require both security and freedom of motion during combat.
One notable advantage of the basket hilt is its adaptability to various gripping styles. Unlike the cup hilt, which mandates a fixed hand position, the basket hilt accommodates multiple grips, empowering users to experiment with different techniques. This versatility makes it particularly appealing to seasoned duelists looking to refine their skills.
From an aesthetic perspective, the basket hilt exudes a rugged charm that appeals to many enthusiasts. Its intricate lattice work invites admiration, while its robust construction inspires trust in its capabilities. Whether employed in historical reenactments or modern martial arts, the basket hilt continues to captivate audiences with its blend of functionality and artistry.
Pommel
Finally, the pommel serves as the finishing touch to the rapier's design, fulfilling both practical and symbolic roles. Located at the base of the hilt, the pommel acts as a counterbalance to the blade, ensuring the weapon maintains proper equilibrium during use. This counterweight effect enhances the rapier's handling characteristics, enabling smoother transitions between attacks and defenses.
Beyond its functional significance, the pommel often incorporates decorative elements that underscore the rapier's status as a prestigious item. Ornate designs, precious stones, and engraved insignias are common features, signifying the owner's rank, allegiance, or personal achievements. These embellishments transform the pommel into a canvas for self-expression, allowing individuals to convey their identity through their choice of weaponry.
When selecting a pommel, consider factors such as weight distribution and visual appeal. A heavier pommel may provide greater stability, whereas a lighter one might prioritize swiftness. Ultimately, the ideal pommel balances form and function, contributing harmoniously to the rapier's overall design.
Final Thoughts on Rapier Components
Understanding the individual parts of a rapier deepens our appreciation for this remarkable weapon. From the sharp precision of the blade to the supportive structure of the hilt, every component plays a crucial role in defining the rapier's character. By studying these elements and applying best practices for maintenance and customization, you can unlock the full potential of your rapier, honoring its legacy as a timeless symbol of elegance and power.
Deja una respuesta